 |
Make a Whatsapp Chat Widget With Multiple Numbers and Accounts |
Hello Creative People, this time I will share an interesting tutorial that is perfect for websites or blogs with the theme of services or selling products. This widget can be used on all kinds of platforms with only HTML, CSS, and Javascript. Of course, it is also suitable for use on WordPress.
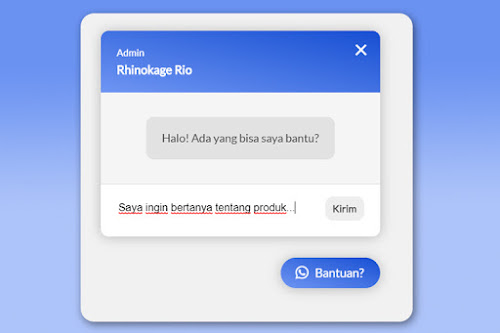
From the picture, you must have imagined how the chatbox widget functions and works. You can add 2 to an unlimited number of accounts that will be connected to WhatsApp. After choosing, visitors can type a message before finally entering the WhatsApp application automatically. You must install this widget if you need more than 2 Customer Service.
VERY EASY
For how to install and also add a WhatsApp account, you only need to copy one of the codes that were previously installed. Likewise, for color and position, everything can be done easily. This guide will include a video to make it easy to understand this tutorial.
This guide is for installation on Blogger / Blogspot.
Please go to Blogger> Themes> Edit HTML.
Place the following CSS just above the code
For this HTML you can put it in Layout> Widget> HTML / Javascript, actually it can be placed anywhere, if you edit HTML, you can place it on top of the Javascript code in the next step.
The code in blue markup is the code that must be changed according to the contact data.
For WhatsApp numbers, don't use the plus + sign, only the country code like 62 .
Place the Javascript below just above the code
Save Template.
Please note, this widget font will automatically follow the default font from the template you are using. Make sure you have installed special fonts and also External CSS such as Font Awesome and jQuery.
 |
| Sample Send Message (Indonesian) |
TUTORIAL ON INSTALLING MULTIPLE WHATSAPP CHAT WIDGETS
This guide is for installation on Blogger / Blogspot.
Please go to Blogger> Themes> Edit HTML.
Place the following CSS just above the code
]]></b:skin>or</style>/* CSS Multiple Whatsapp Chat */
#whatsapp-chat{position:fixed;background:#fff;width:350px;border-radius:10px;box-shadow:0 1px 15px rgba(32,33,36,.28);bottom:90px;right:30px;overflow:hidden;z-index:99;animation-name:showchat;animation-duration:1s;transform:scale(1)}
a.blantershow-chat{background:linear-gradient(to right top,#6f96f3,#164ed2);color:#fff;position:fixed;z-index:98;bottom:25px;right:30px;font-size:15px;padding:10px 20px;border-radius:30px;box-shadow:0 1px 15px rgba(32,33,36,.28)}
a.blantershow-chat i{transform:scale(1.2);margin:0 10px 0 0}.header-chat{background:linear-gradient(to right top,#6f96f3,#164ed2);color:#fff;padding:20px}
.header-chat h3{margin:0 0 10px}.header-chat p{font-size:14px;line-height:1.7;margin:0}
.info-avatar{position:relative}.info-avatar img{border-radius:100%;width:50px;float:left;margin:0 10px 0 0}
.info-avatar:before{content:'\f232';z-index:1;font-family:"Font Awesome 5 Brands";background:#23ab23;color:#fff;padding:4px 5px;border-radius:100%;position:absolute;top:30px;left:30px}
a.informasi{padding:20px;display:block;overflow:hidden;animation-name:showhide;animation-duration:2.5s}
a.informasi:hover{background:#f1f1f1}.info-chat span{display:block}#get-label,span.chat-label{font-size:12px;color:#888}
#get-nama,span.chat-nama{margin:5px 0 0;font-size:15px;font-weight:700;color:#222}#get-label,#get-nama{color:#fff}span.my-number{display:none}
.blanter-msg{color:#444;padding:20px;font-size:12.5px;text-align:center;border-top:1px solid #ddd}
textarea#chat-input{border:none;font-family:'Arial',sans-serif;width:100%;height:20px;outline:none;resize:none}
a#send-it{color:#555;width:40px;margin:-5px 0 0 5px;font-weight:700;padding:8px;background:#eee;border-radius:10px}
.first-msg{background:#f5f5f5;padding:30px;text-align:center}
.first-msg span{background:#e2e2e2;color:#333;font-size:14.2px;line-height:1.7;border-radius:10px;padding:15px 20px;display:inline-block}
.start-chat .blanter-msg{display:flex}#get-number{display:none}a.close-chat{position:absolute;top:5px;right:15px;color:#fff;font-size:30px}
@keyframes showhide{from{transform:scale(.5);opacity:0}}@keyframes showchat{from{transform:scale(0);opacity:0}}
@media screen and (max-width:480px){#whatsapp-chat{width:auto;left:5%;right:5%;font-size:80%}}
.hide{display:none;animation-name:showhide;animation-duration:1.5s;transform:scale(1);opacity:1}
.show{display:block;animation-name:showhide;animation-duration:1.5s;transform:scale(1);opacity:1}For this HTML you can put it in Layout> Widget> HTML / Javascript, actually it can be placed anywhere, if you edit HTML, you can place it on top of the Javascript code in the next step.
<div id='whatsapp-chat' class='hide'>
<div class='header-chat'>
<div class='head-home'><h3>Hello!</h3>
<p>Click one of our representatives below to chat on WhatsApp or send us an email to rioblanter@gmail.com</p></div>
<div class='get-new hide'><div id='get-label'></div><div id='get-nama'></div></div></div>
<div class='home-chat'>
<!-- Info Contact Start -->
<a class='informasi' href='javascript:void' title='Chat Whatsapp'>
<div class='info-avatar'><img src='https://blogger.googleusercontent.com/img/b/R29vZ2xl/AVvXsEigRSTrAoXtiCxObWHlEmSt5I9ehhw0-2n40TOi66ZF-GE43gzJpCHBUaHLXZ4YOEj7GYFv3p3dG1OSOngOkaMGbRAqwaIPPoUnMEktmozylRQ5izQcOn8m6y3GclpHzmp7uHzgwxK_CeY/s70/supportmale.png'/></div>
<div class='info-chat'>
<span class='chat-label'>Support</span>
<span class='chat-nama'>Customer Service 1</span>
</div><span class='my-number'>6281977094280</span>
</a>
<!-- Info Contact End -->
<!-- Info Contact Start -->
<a class='informasi' href='javascript:void' title='Chat Whatsapp'>
<div class='info-avatar'><img src='https://blogger.googleusercontent.com/img/b/R29vZ2xl/AVvXsEgUCD78MWZm6NWGPzhdacX-BdJuVf5-XNQKkdc3gs6zvEsH0GM0Qnjy8mzJEgmHntND3jAWycupjic0GuwQ-XdwTxcHsgwBa1pAkMr9PjdEiFkh4AZNZQQnYLrohNBnKq8mZ421sCBAMWM/s70/supportfemale.png'/></div>
<div class='info-chat'>
<span class='chat-label'>Sales</span>
<span class='chat-nama'>Customer Service 2</span>
</div><span class='my-number'>6222222222</span>
</a>
<!-- Info Contact End -->
<div class='blanter-msg'>Call us to <b>+62123456789</b> from <i>0:00hs a 24:00hs</i></div></div>
<div class='start-chat hide'>
<div class='first-msg'><span>Hello! What can I do for you?</span></div>
<div class='blanter-msg'><textarea id='chat-input' placeholder='Write a response' maxlength='120' row='1'></textarea>
<a href='javascript:void;' id='send-it'>Send</a></div></div>
<div id='get-number'></div><a class='close-chat' href='javascript:void'>×</a>
</div>
<a class='blantershow-chat' href='javascript:void' title='Show Chat'><i class='fab fa-whatsapp'></i>How can I help you?</a>
The code in blue markup is the code that must be changed according to the contact data.
For WhatsApp numbers, don't use the plus + sign, only the country code like 62 .
Place the Javascript below just above the code
</body><script type='text/javascript'>
//<![CDATA[
/* Whatsapp Chat Widget by www.idblanter.com */
$(document).on("click","#send-it",function(){var a=document.getElementById("chat-input");if(""!=a.value){var b=$("#get-number").text(),c=document.getElementById("chat-input").value,d="https://web.whatsapp.com/send",e=b,f="&text="+c;if(/Android|webOS|iPhone|iPad|iPod|BlackBerry|IEMobile|Opera Mini/i.test(navigator.userAgent))var d="whatsapp://send";var g=d+"?phone="+e+f;window.open(g, '_blank')}}),$(document).on("click",".informasi",function(){document.getElementById("get-number").innerHTML=$(this).children(".my-number").text(),$(".start-chat,.get-new").addClass("show").removeClass("hide"),$(".home-chat,.head-home").addClass("hide").removeClass("show"),document.getElementById("get-nama").innerHTML=$(this).children(".info-chat").children(".chat-nama").text(),document.getElementById("get-label").innerHTML=$(this).children(".info-chat").children(".chat-label").text()}),$(document).on("click",".close-chat",function(){$("#whatsapp-chat").addClass("hide").removeClass("show")}),$(document).on("click",".blantershow-chat",function(){$("#whatsapp-chat").addClass("show").removeClass("hide")});
//]]>
</script>
Please note, this widget font will automatically follow the default font from the template you are using. Make sure you have installed special fonts and also External CSS such as Font Awesome and jQuery.
If you haven't used Font Awesome and jQuery, you can add the following code above the code,
</head>usually the latest version of the template uses Font Awesome (Icons) and jQuery.Font Awesome
<link href='https://use.fontawesome.com/releases/v5.8.2/css/all.css' rel='stylesheet' type='text/css'/>
jQuery
<script src='https://ajax.googleapis.com/ajax/libs/jquery/3.3.1/jquery.min.js'></script>
This WhatsApp chat widget is perfect when combined with the Any Blogger template.
That's the tutorial that I can share this time, don't forget to Bookmark, Subscribe and Comment for the next tutorial. thanks.

Post a Comment
What Themes or Plugins You Need?